This chapter contains the following topics:
Employee Payroll History Report
Employer Payroll Expense Report
Employee Gross Hours and Wages Report
Use this selection to print either of the following reports:
| • | Employee Payroll History Report |
Use this report to show the history of payroll transactions and adjustments for employees who have received computer-printed, handwritten payroll checks or direct deposit pay. The report shows employee pay, earnings, taxes, and voluntary deductions.
| • | Employer Payroll Expense Report |
Use this report to show the history of payroll employer expenses for employees who have received computer-printed, hand-written payroll checks or direct deposit pay.
The selections for both of these reports are very similar. By entering the same date range and same employee range for both reports, the full data for the selected payroll transactions can be obtained.
Payroll history information can be optionally purged when printing Employee Payroll History.
The Employee Payroll History Report shows all payroll transactions and adjustments that have taken place within a specified period for a specified range of employee numbers.
Payroll transactions and adjustments include regular and special pay transactions, advanced vacation and separate vacation transactions, and adjustments.
See a Employee Payroll History report example in the Form and Report Examples appendix.
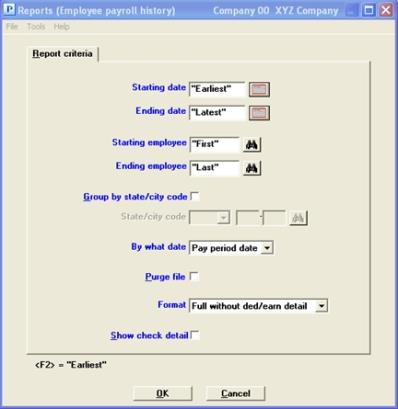
Select
Employee payroll history from the Reports, Employee/Employer menu of the PR menu.
Graphical Mode
The following screen displays:
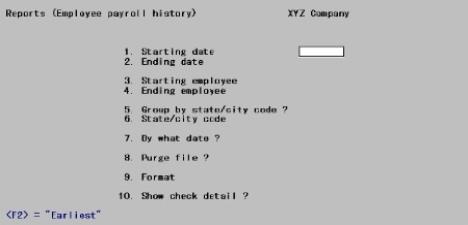
Character Mode
The following screen displays:
Enter the following information:
Ending date
Options
Date refers to either pay period date or check date, as will be determined in the By what date field. Enter the range of dates desired, or use the option:
|
<F2> |
For the Earliest (at Starting date field) or Latest (at Ending date field) date |
|
Format |
MMDDYY at each field |
|
Example |
Press <F2> at both fields |
Ending employee
Options
Enter the range of employees who have transactions or adjustments to include in the report, or use the option:
|
<F2> |
For the First (at Starting employee field) or Last (at Ending employee field) employee, in employee number sequence |
|
Format |
999999 at each field |
|
Example |
Press <F2> at both fields |
This field allows you to report payroll history by state or city code. Checking this box (entering Y) allows you to specify the state or city code at the next field. Leaving it unchecked (entering N) allows you to report payroll history by employee, no matter which states your employees worked in for the date range entered above.
|
Format |
Graphical: Check box where checked is yes and unchecked is no Character: One letter, either Y or N |
|
Example |
Type N |
If you unchecked (answered N) to the previous field, this field is skipped. Otherwise, select State (enter S) or City (enter C).
|
Format |
Graphical: Drop down list: Select State or City Character: One letter, either S or C |
|
Example |
(Does not occur in this example because you entered N at the preceding field) |
Options
After selecting state or city, enter the desired tax code. Any input is accepted; however, only a valid tax code already defined in the Tax tables selection is meaningful. See the Tax Tables chapter. You can also use the option:
|
<F5> |
For All states or All cities |
In the case of multi-city / multi-state employees, history will be selected for inclusion in the report without regard to whether the state or city is an employee’s primary state / city or one of the alternates to which he may be liable for taxes.
|
Format |
Two characters (for state or city) One character (for the individual tax table within that state or city) |
|
Example |
(These fields are skipped.) |
You can have the report print in either Pay period date (P) order or Check date (C) order.
|
Format |
Graphical: Drop down list, either Pay period date or Check date. The default is Pay period date Character: One letter, either P or C. The default is P |
|
Example |
Press <Enter> |
Check this box (enter Y) if you want to purge Payroll History of information for the range of dates and employee numbers that you have specified above.
Although purging is useful to prevent used disk space from growing indefinitely, great caution should be exercised not to purge information which you still need. In particular:
| • | There are two methods for moving data into Check Reconciliation: batch transfer and automatic direct post. The method used is determined by the set up in C/R Control information. As both relate to history data, they are explained here: |
When you batch transfer the net pay into C/R, Payroll History data is used to transfer your payroll checks and direct deposit transactions to your checkbook. When this is the case, do not purge pay transactions which you have not yet transferred. Refer to the Transfer Checks/Deposits chapter in the C/R User documentation.
If you selected to post from Payroll automatically into Check Reconciliation, you may purge history at any time because the net pay data is already in C/R.
| • | If you use ODBC or SQL for reporting, purged data is no longer accessible. |
| • | Do not purge if you answer Pay period date to the By what date field above. Some fields for the electronic report processing (for example, employees covered by unemployment insurance for month 1 through 3) use Employee History to check if an employee was employed at a specific period in time. If the records are deleted, this feature is not available. |
| • | If commissions are paid by separate checks rather than the regular payroll, be sure not to purge the history until commissions have been paid for it. For example, if commissions earned October through December are to be paid on January 15, wait till then before purging those months. |
| • | Payroll history data is used when printing the following reports: Check register history, Meals expense, Union deductions, Employee payroll expense, 401(k) contributions, Employee gross hours and wages and the Employee leave report. You should verify that you no longer need the data for these reports before you purge. |
| • | The data is needed for the Illinois IDES reporting. This is explained later in this chapter. |
Closing a payroll year removes data for the closed year for most Payroll files/tables. Payroll history is not removed.
|
Format |
Graphical: Check box where checked is yes and unchecked is no. The default is unchecked Character: One letter, either Y or N. The default is N |
|
Example |
Press <Enter> |
If you have checked the box (entered Y) to the Purge file field, this field is set to Ded/earn detail (Full format) (D) automatically so you will have a permanent record of what has been purged.
Options
Otherwise, choose one of three formats:
| Character Mode | Graphical Mode | Description |
|
B |
Brief |
Brief only |
|
F |
Full without ded/earn detail |
Full detail, without deductions and earnings detail (taxes and total deductions are shown) |
|
D |
Ded/earn detail (Full format) |
Full detail, with deductions and earnings detail. Tax and deduction detail are shown, as are detail lines for the permanent and temporary deductions and for earnings taken via D/E codes |
|
Format |
Graphical: Drop down list from the table above. The default is Full without ded/earn detail Character: One character from the table above. The default is F |
|
Example |
Press <Enter> |
To see check detail for each employee appearing on the report, check this box (enter Y). To see a summary for each employee, without check detail, leave it unchecked (enter N).
|
Format |
Graphical: Check box where checked is yes and unchecked is no. The default is unchecked Character: One letter, either Y or N. The default is N |
|
Example |
Select <Enter> for the default |
Make any needed changes. Select OK or press <Enter> to print the report.
Based on Illinois reporting regulations, there are Employee payroll history report options that produces a csv output which complies with the Illinois Department of Employment Security (IDES) regulations. Most employers who are required to submit their contribution and wage reports electronically. Read the Illinois published regulations to verify if this applies to you. See www.ides.illinois.gov/
With the proper report settings, the Employee payroll history report will produce the required csv output. For an explanation of a csv file see Comma-delimited.
Here is an example of the report screen criteria which will cause the csv output to be generated:
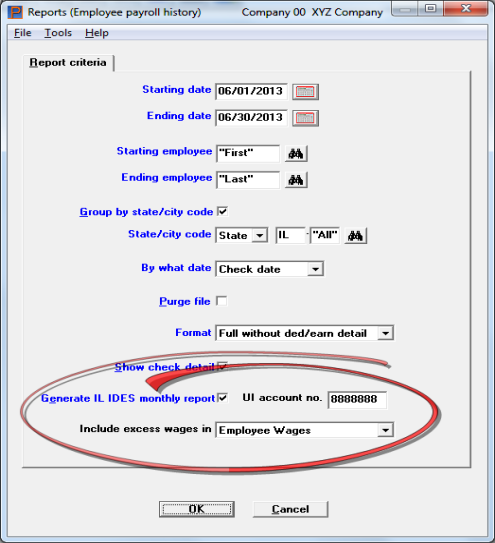
Use these report settings:
| • | Enter a starting and ending date range for the month you are reporting. |
| • | Print “First” to “Last” employees. |
| • | Select to Group by state/city code and enter "IL" as the state. |
| • | Select to print by Check date. |
| • | The format is not relevant, except that you will also print the report to screen, printer or disk. You may want to save a copy of the report for referencing later. |
| • | There are three fields on the screen that are specific to the IDES reporting. They are only available if you grouped by state/city and entered “IL” as the state. Employees that reside in a state other than Illinois are not included on the report. |
Here are the details about the fields related to IDES reporting:
Generate IL IDES monthly report
This field determines whether or not the csv output of the Illinois IDES data is generated. Check the box to generate a csv output file or leave it unchecked to print the report only.
Enter the Illinois unemployment insurance account number.
The choices are Employee Wages and Employee Wages unallocated. Excess wages are an employee’s wages over $15,000 a month. Review the IDES documentation to determine which option applies to you.
|
Employee Wages |
This option reports all the wages of an employee for a month. |
|
Employee Wages unallocated |
This option puts the monthly excess wages in the employer record field called Excess wages. |
|
Note |
The Federal Tax ID report number is needed for the csv file and is taken from the Federal Tax Table. |
Running the IDES Report
When running it with the correct report settings, it produces a comma separated (.csv) plain ASCII text file in the top-level PBS folder. It is named something like ILUIMonthWage062013_00.csv. The first six numeric characters in the name are the starting month and year of the period. The last two numeric characters increment each time the file is generated for a given month.
|
Note |
The file contains sensitive data. Depending on who has access to the file, you may need to move it to a secure location as soon as possible after generating it. |
|
Note |
When generating the csv file on a Thin client system, it is produced in the top-level PBS folder and it is also copied to your local workstation in the folder where the Thin client runtime components are stored. |
|
Note |
The State of Illinois web site provides a means of testing the data in the file. We HIGHLY recommend that you run this test each time you submit your production file. |
IDES Examples
The employer record (E) is first. Each employee record (S) follows.
This is a sample csv output with the Employee Wages option:
E,771234567,1234567,37000.00,0
S,Arnold,Wilson,666-00-9123,6000.00
S,Bob,Jackson,666-00-2222,1000.00
S,Jason,Roberts,666-00-1111,29000.00
Here is an example of the same data using the Employee Wages unallocated option:
E,771234567,1234656,37000.00,14000.00
S,Arnold,Wilson,666-00-9123,6000.00
S,Bob,Jackson,666-00-2222,1000.00
S,Jason,Roberts,666-00-1111,15000.00
The Employee Wages option has Jason Roberts with an income of $29,000. The Employee Wages unallocated option has his wages reported as $15,000 and the amount over $15,000 is included in the last employer field.
The Employer Payroll Expense Report shows employer expenses for all payroll transactions and adjustments that have taken place within a specified period for a specified range of employee numbers.
This report shows employer expenses such as social security, medicare, FUI, SUI, Employer OST (Other State Tax), etc.
See a Employer Payroll Expense report example in the Form and Report Examples appendix.
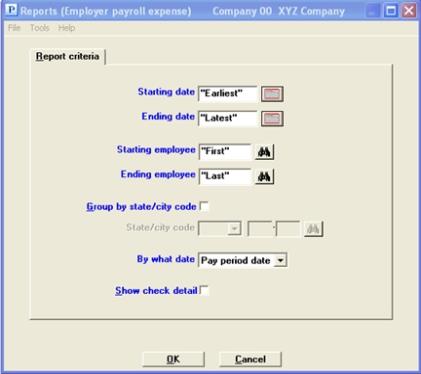
Select
Employer payroll expense from the Reports, Employee/Employer menu.
Graphical Mode
A screen displays for you to enter the following information:
Character Mode
A screen displays for you to enter the following information:
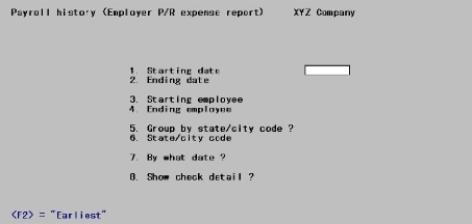
Ending date
Options
Date refers to either pay period date or check date, as will be determined in the By what date field. Enter the range of dates desired, or use the option:
|
<F2> |
For the Earliest (at Starting date field) or Latest (at Ending date field) date |
|
Format |
MMDDYY at each field |
|
Example |
Press <F2> at both fields |
Ending employee
Options
Enter the range of employees who have transactions or adjustments to include in the report, or use the option:
|
<F2> |
For the First (at Starting employee field) or Last (at Ending employee field) employee, in employee number sequence |
|
Format |
999999 at each field |
|
Example |
Press <F2> at both fields for a range from First to Last |
This field allows you to report payroll history by state or city code. Checking this box (entering Y) allows you to specify the state or city code at the next field. Leaving it unchecked (entering N) allows you to report payroll history by employee, no matter which states your employees worked in for the date range entered above.
|
Format |
Graphical: Check box where checked is yes and unchecked is no. The default is unchecked Character: One letter, either Y or N |
|
Example |
Check this box or type Y |
If you answered N to the previous question, this field is skipped. Otherwise, select State or City or in character enter S or C.
|
Format |
Graphical: Drop down list: Select State or City Character: One letter, either S or C |
|
Example |
Select State or type S |
Options
After selecting state or city, enter the desired tax code. Any input is accepted; however, only a valid tax code already defined in the Tax tables selection is meaningful. You can also use the option:
|
<F5> |
For All states or All cities |
In the case of multi-city / multi-state employees, history will be selected for inclusion in the report without regard to whether the state or city is an employee’s primary state / city or one of the alternates to which he may be liable for taxes.
|
Format |
Two characters (S for state or C for city) One character (for the individual tax table within that state or city) |
|
Examples |
Type CA (for California) Type M (for married) |
You can have the report print in either Pay period date (P) order or Check date (C) order.
|
Format |
Graphical: Drop down list. The default is Pay period date Character: One letter, either P or C. The default is P |
|
Example |
Press <Enter> |
To see check detail for each employee appearing on the report, check this box (enter Y). To see a summary for each employee, without check detail, leave it unchecked (N).
|
Format |
Graphical: Check box where checked is yes and unchecked is no. The default is unchecked Character: One letter, either Y or N. The default is N |
|
Example |
Select the <Space bar> to check the box or type Y |
Make any needed changes. Select OK or press <Enter> to print the report.
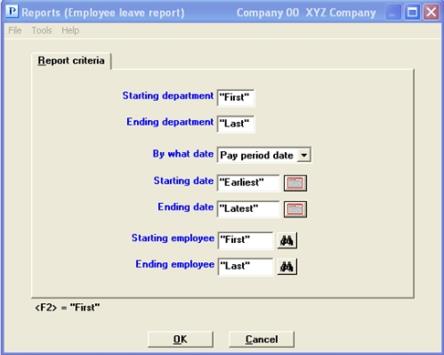
The Employee Leave Report shows vacation and sick time that has accrued and been used within a specified period, for a specified range of employee numbers and arranged by specific departments.
See a Employee Leave Report example in the Form and Report Examples appendix.
Select
Employee leave report from Reports, Employee/Employer selection of the PR menu.
Graphical Mode
The following screen displays:
Character Mode
The following screen displays:
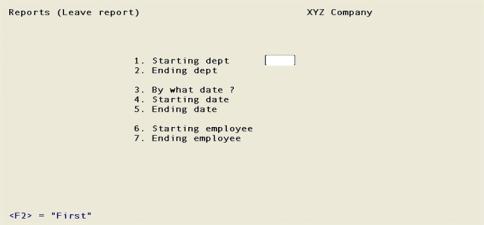
Enter the following information:
Ending department
Options
Enter the range of departments that have vacation and sick time to include in the report, or use the option:
|
<F2> |
For the “First” (at Starting department field) or “Last” (at Ending department field) |
|
Format |
9999 at each field |
|
Example |
Press <F2> at both fields |
You can have the report print in either Pay period date (P) order or Check date (C) order.
|
Format |
Graphical: Drop down list. The default is Pay period date Character: One letter, either P or C. The default is P |
|
Example |
Press <Enter> |
Ending date
Options
Date refers to check date. Enter the range of dates desired, or use the option:
|
<F2> |
For the “Earliest” (at Starting date field) or “Latest” (at Ending date field) |
|
Format |
MMDDYY at each field |
|
Example |
Press <F2> at both fields |
Ending employee
Options
Enter the range of employees who have vacation or sick time to include in the report, or use the option:
|
<F2> |
For the “First” (at Starting employee field) or “Last” (at Ending employee field) employee, in employee number sequence |
|
Format |
999999 at each field |
|
Example |
Press <F2> at both fields |
Make any needed changes. Select OK or press <Enter> to print the report.
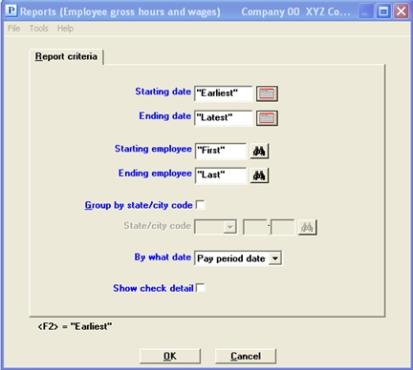
The Gross Hours and Wages report for each employee shows regular pay hours, overtime pay hours, vacation pay hours, holiday hours sick pay hours and special pay hours by a specific date. It will group the data by state or city tax code.
You may either select to print check details or totals only.
Based on the Department or Labor Overtime Rule, covered under the Fair Labor Standards Act, this report indicates when an employee had worked overtime hours but received no pay for those hours. To read more about the rule, see DOL Overtime Rule in the Employees chapter. When overtime hours was entered and a zero rate per hour was used, the following message prints on the report:
Non-exempt salaried employee missing overtime rate !!!
See a Employee Gross Hours and Wages with Check Details report example in the Form and Report Examples appendix.
Select
Employee gross hours and wages from the Reports, Employee/Employer menu.
Graphical Mode
The following screen displays:
Character Mode
The following screen displays:
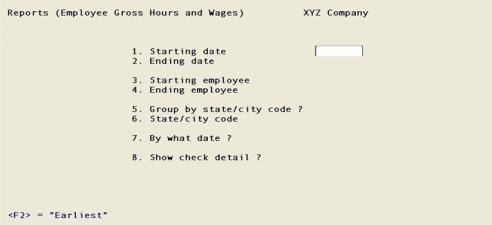
Enter the following information:
Ending date
Options
Date refers to check date or pay period date depending on the setting for field 7. Enter the range of dates desired, or use the option:
|
<F2> |
For the Earliest (at Starting date field) or Latest (at Ending date field) |
|
Format |
MMDDYY at each field |
|
Example |
Press <F2> at both fields |
Ending employee
Options
Enter the range of employees who have hours worked to include in the report, or use the option:
|
<F2> |
For the First (at Starting employee field) or Last (at Ending employee field), in employee number sequence |
|
Format |
999999 at each field |
|
Example |
Press <F2> at both fields |
This field allows you to report payroll hours worked by state or city code. Check this box (enter Y) allows you to specify the state or city code at the next field. Leaving it unchecked (entering N) allows you to report hours worked by employee, no matter which states your employees worked in for the date range entered above.
|
Format |
Graphical: Check box where checked is yes and unchecked is no. The default is unchecked Character: One letter, either Y or N |
|
Example |
Select the <Space bar> to check the box or type Y |
If you unchecked the box (answered N) to the previous question, this field is skipped. Otherwise, select State or City or enter S or C.
|
Format |
Graphical: Drop down list: Select State or City Character: One letter, either S or C |
|
Example |
Select State or type S |
Options
After selecting state or city, enter the desired tax code. Any input is accepted; however, only a valid tax code already defined in the Tax tables selection is meaningful. You can also use the option:
|
<F5> |
For All states or All cities |
In the case of multi-city / multi-state employees, history will be selected for inclusion in the report without regard to whether the state or city is an employee’s primary state / city or one of the alternates to which he may be liable for taxes.
|
Format |
Two characters (for the individual tax table within that state or city) One character |
|
Examples |
Type CA (for California) Type M (for Married) |
You can have the report print in either Pay period date (P) order or Check date (C) order.
|
Format |
Graphical: Drop down list. The default is Pay period date Character: One letter, either P or C. The default is P |
|
Example |
Press <Enter> |
To see check detail for each employee appearing on the report, check the box (enter Y). To see a summary for each employee, without check detail, uncheck the box (enter N).
|
Format |
Graphical: Check box where checked is yes and unchecked is no. The default is unchecked Character: One letter, either Y or N. The default is N. |
|
Example |
Type Y |
Make any needed changes. Select OK or press <Enter> to print the report.
Select Cancel or <Esc> to return to the menu without printing the report.
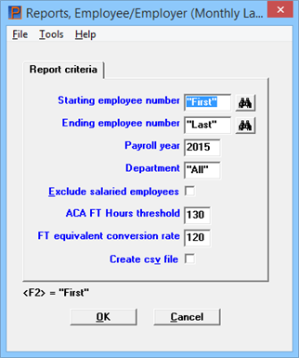
The Monthly Labor Summary report helps you analyze your need for tracking Affordable Care Act data.
TFor information on the Passport ACA Management Software features and functions, see the Affordable Care Act chapter.
The Monthly labor summary report is useful in these ways:
| • | When running "First" to "Last" employees for all departments, the Monthly labor summary helps determine the number of full-time equivalent (FTE) employees you have. if you are at or near 50 employees, this report help you to decide whether or not you need to file ACA data. |
| • | This report provides information that will help you fill out the employee ACA records. |
| • | After the install of the Passport ACA Management Software, it can be run at any time during the year as a cross check for the ACA data already entered. |
| • | The Monthly labor summary can be run at any time to help determine seasonal employees. |
The entry screen has the criteria of employee number range, the fiscal year and department. There is an option to exclude salaried employees as they tend to be full-time. However, in order to know the total number of employees, you should includ every employee in the report.
The report can be both printed and saved to disk as a CSV file.
The Monthly labor summary report uses the period end date to calculate an employee's work days. In order for the report to be accurate, the period ending dates must have been entered accurately in Time worked. Periods should not overlap and there should not be days that are unaccounted for between periods. You can verify your period ending dates by running the Check register history report. The Monthly labor summary report uses data from Time Worked history (TIMHIS) and Adjustment History (MANHIS).
Non-employees and employees that did not work during the entered fiscal year are excluded from the report.
The output report will print the months each employee worked and how many hours per month each employee worked. The body has two rows of data:
| • | The first row includes the Employee #, Employee name, hire date, termination date, pay type and pay period. |
| • | The second row includes the number of hours worked by employee for each month. For each month the report totals the regular, overtime, vacation, holiday, sick and special pay hours. If the employee has a pay period of weekly or bi-weekly, only the actual number of hours worked in a month is added to the total hours for the month. For example, if paid bi-weekly and the pay period starts Monday, November 30, 1015 and the employee works 80 hours in the bi-weekly period, 8 hours is included for the last day in November and 72 hours for the remaining hours in December. |
The Estimate of FT and equivalents totals line adds the full-time employees plus full-time equivalent employees. It uses the data in the ACA FT hours threshold field (defaulted to 130) and FT equivalent conversion rate field (defaulted to 120). Every employee over 130 hours per month counts as one. For employees under 130 hours per month, the report adds all the remaining hours and divides by 120 to get the number of full-time equivalents.
For employees paid weekly (7 days) and bi-weekly (14 days), when the pay period crosses two months, a portion of the hours are allocated for each month. This is done by dividing the number of days in the pay period into the total hours worked. All days during the pay period, including weekends and any other days not worked, are counted as a work day regardless.
This report assumes that your monthly and bi-monthly pay periods are all within one month.
Select
Monthly labor summary from the Reports, Employee/Employer menu.
The following screen displays:
Character Mode
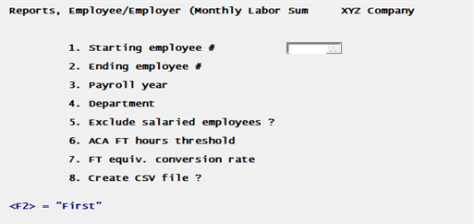
Enter the following fields:
Starting employee number and Ending employee number
Enter the range of employees who have hours worked to include in the report, or use the option:
|
<F2> |
For the "First" (at Starting employee number field) or "Last" (at Ending employee number field), in employee number sequence |
|
Format |
999999 at each field |
|
Example |
Press <F2> at both fields |
Enter the payroll year. The report prints data for all twelve months of the year.
Any input is accepted; however, only a valid department already entered in the Employees selection is meaningful. You can also use the option:
|
<F5> |
For "All" departments |
Normally salaried employees are full-time. If you want to exclude salaried employees to determine how many hourly employees are full-time, do so by checking this box. Otherwise, leave the box unchecked.
The threshold, per the Affordable Care Act for 2015 is 130 hours in a month. Assuming the threshold has not changed use the default. Otherwise enter an hour per month threshold that matches the current regulations.
The full-time equivalent conversion rate, per the Affordable Care Act for 2015 is 120. Use the default rate, or if it changed, enter the rate that matches the current regulations.
Check this box to generate a csv file output and print the report. Leaving the box unchecked will only print the report.
Running the report on a Windows or Thin client system generates a CSV file automatically and launches your default system program and opens the CSV file. Using Linux/UNIX telnet the program saves the CSV file to the ACACSV directory under the top-level PBS directory, however, the program does not automatically launch a system CSV program.
If you want to keep this data confidential, only allow users that can create the Payroll csv output to have access to the folder where you store the file.
The file is named similar to this:
00_Montly_Labor_Summary_2015_20151104_14312628.CSV
In the example above, 00 is the company ID. Montly_Labor_Summary is the name of the report, 2015 is the tax year and 20151104_14312628 is the date and time it was created.
Select OK to display a list of printers and print the report or select Cancel to return to the menu without printing.
If you checked the box for creating a csv file you will be asked to select a location.